
Intro: Everywhere other than the USA, Corrado's had standard none automatic seatbelts. Since I always hated the auto belts, I finally did something about it before they started to malfunction like so many other's have reported. I contacted a guy on the Internet whom I had sourced European headlights from located in Finland. He has access to many Corrado wrecks and could get me everything needed for this swap. Luckily, all the manual belt brackets, fittings and bolt holes are still the the US Corrado frames. All the Euro parts are a direct bolt in fit. Euro style center console/handbrake covering (not depicted in this write up) and the A- and B- pillar panels as well as modifications to the front seats are necessary for this swap. I suspect all these parts are available from Canada also as they didn't have the auto belts. Consult the EKTA parts CD for actual part numbers for ordering purposes.
*** IMPORTANT: Seatbelts are the major safety feature of the car. When fitting used components especially if they are from a wreck, make sure everything is in proper working condition with no damage to the belt material or deformations in the brackets. This can indicate they have under gone a stress loading (i.e. accident) and are not be suitable for further use. Refer to Bentley manual for all critical bolt torques and use a torque wrench. I used LockTite thread locker compound on all critical nuts and bolts.
Proceed at your own risk.
Step 1: Remove Front Seats & Center Console.
Fig.1: To remove the front seats, first remove the allen socket head screw & nut as indicated. With this removed the seat will be able to slide all the way backwards and off the tracks once the track stops are removed (see Fig.2)
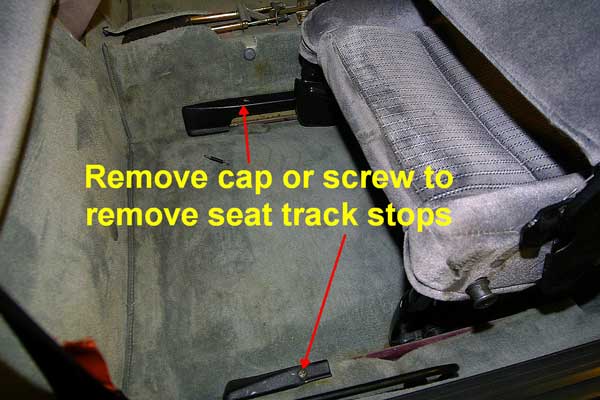
Fig.2: Remove the track stops behind the seats by prying off the plastic snap cap on the center side and removing the screw on the door side. The stops can then be lifted off the tracks. With the stops removed, slide the seats fully back until the rear sliders can come clear of the tracks. Lift the seat up while tilting forward and slide the front edge backwards until you can pull the whole seat out of the car. Be careful with grease getting on carpeting etc. I've already removed the center console in this photo. Bentley describes this pretty well so I won't detail it here,
Step 2: Remove the inner panels
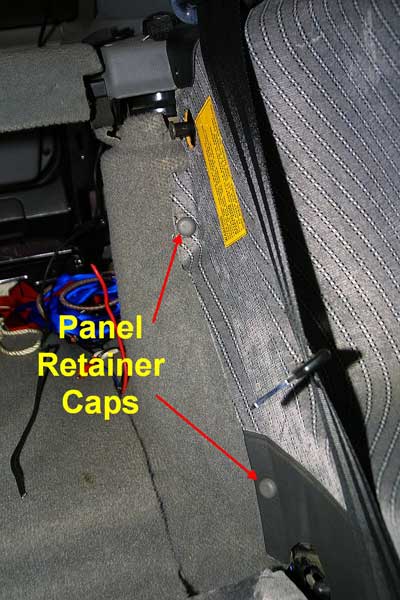
Fig.3: Remove the rear seat side panel. Twist the panel retainer caps to remove them. There is also a screw located at the front, lower corner and a couple of panel retainers underneath. These retainers usually pop off with a bit of a pull. Note that this panel cannot be completely removed since the rear seatbelt passes through it (unless you want to remove it's mechanism as well). I just pushed the panel out the way while working.
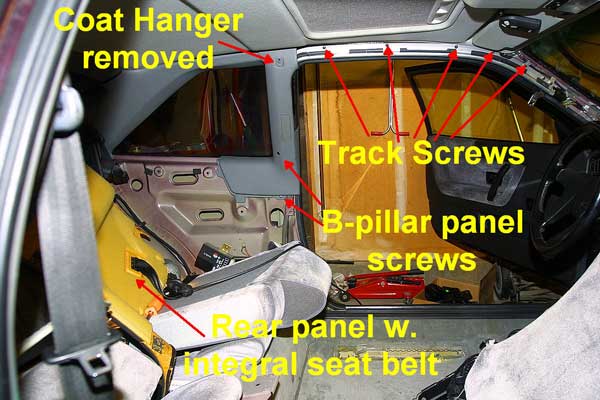
Fig. 4: A-pillar panel is removed by prying off the small round plastic caps that hide the screw heads. Removing the screws and popping of the retainers complete the removal. To remove the B-pillar, first pry off the coat hanger plastic cover, and remove the screwed on hanger bracket. Remove the two remaining B-pillar panel screws and pull the panel off. Also shown is the rear seat side panel pushed out of the way. Don't take all the track screws off until you're ready to extract the whole track and motor assembly together...you'll risk bending the track if you do.
Step 3: Remove the track and Motor assembly
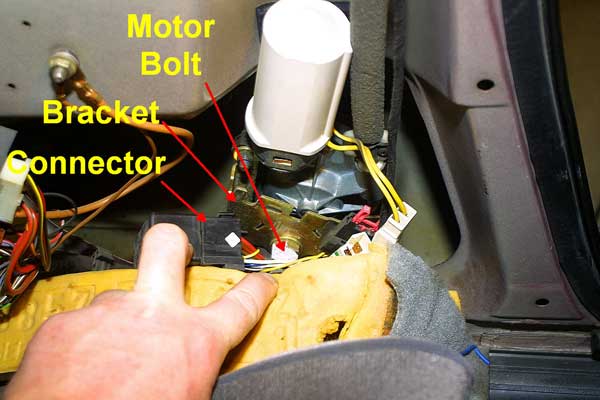
Fig. 5: The track motor Assembly. First remove the electrical connectors from the metal bracket by pulling up. Disconnect the two conductor (white) connector from the motor. This exposes the large bolt holding the motor to the frame. Remove the bolt to release the assembly.
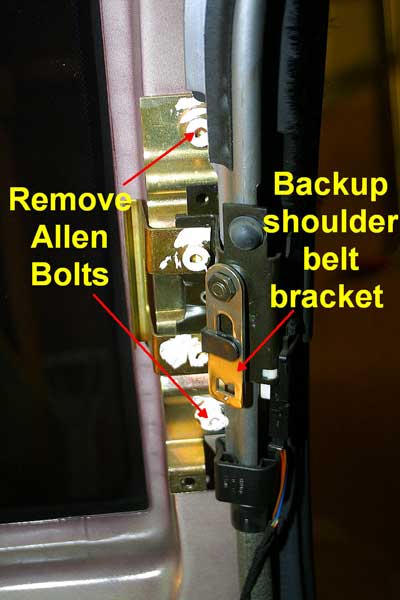
Fig. 6: The shoulder anchor assembly on the B-pillar. Remove the two allen socket bolts and finally remove any remaining track screws to complete the removal of the entire belt track and motor assembly. Also shown is the backup auxillary shoulder belt anchor bracket to be used if your track fails. This is accessible with the b-pillar panel still in place. Pry off the rectangular cover piece in the B-pillar panel to reveal this bracket. Swing the bracket forward away from the clip. Detach the shoulder belt "mouse" from the track by pushing the orange button and re-attach it to this bracket.
Step 4: Install the Euro Belt components
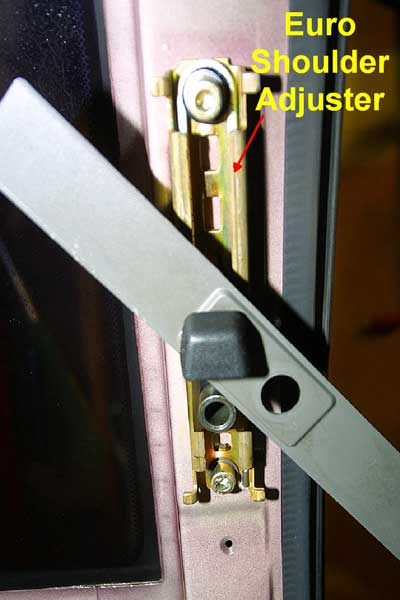
Fig. 7: The Euro shoulder belt anchor point. Height is adjustable via the black knob. Bolts right up to the stock holes in the b-pillar. I used Bentley manual torque specs & LockTite thread locking compound for all critical components. Note the grey covering panel is shown here. However, you must slide this into slots in the opening the B-pillar panel so it should be removed and put in the B panel prior to fitting the B panel. Remove it by carefully removing the black adjuster knob (wire clips on the inside) and sliding it off. I accidently broke the passenger side knob off the little extension...looks like an Epoxy repair is in my future.
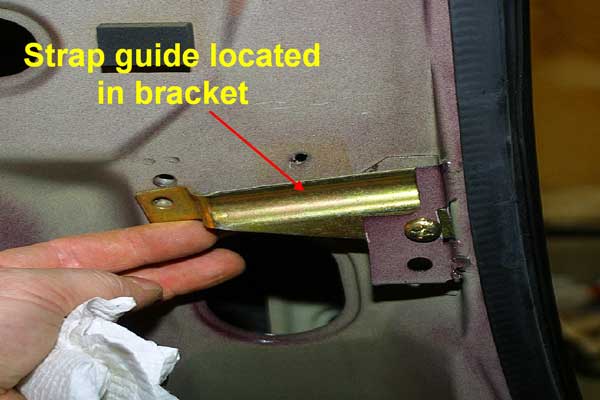
Fig. 8: This is the driverside strap guide piece being fitted to the stock braket in the frame. Sure was nice for VW to leave all these nice brackets for the USA cars. Leave one side off until you've put the belt under it.
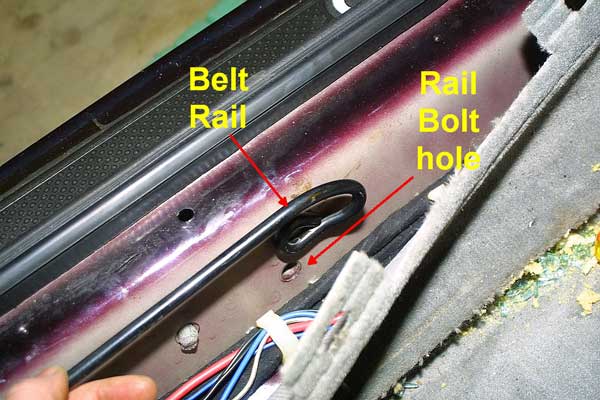
Fig.9: This is looking down at the driverside door sill showing a test fitting of the lower belt rail. There is a threaded hole in the sill for the bolt to hold the rail in place. Note that the rail will be installed overtop of the carpeting, not underneath it as shown here.

Fig.10: The rear end of the belt rail is hooked into the anchor bracket in the rear seat flooring. Again, this is shown without the carpet in place. The rail will pass through a hole in the carpet to reach this bracket. Don't forget to put the actual belt slider on the rail prior to anchoring the rear end and bolting the rail in place at the front end.

Fig. 11: The rail and belt slider all set up. A hole had to be made in the carpet to pass the rail at the rear end and another was made for the bolt at the front end. Make sure you test out how the belt will lay across your chest to avoid twists etc.
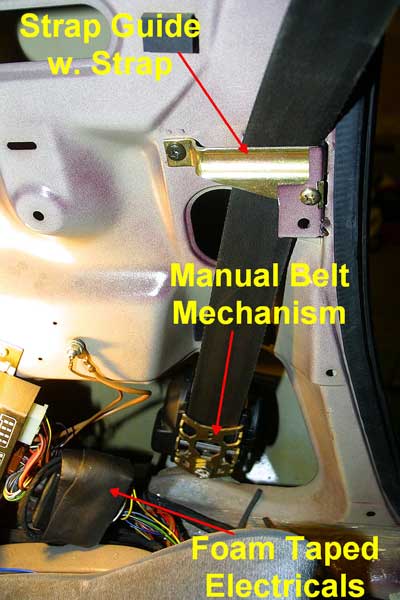
Fig: 12: The recoil mechanism is installed using a single bolt in the stock location. Note the orientation of the recoiler...it can go in flipped around but the inertial lock will not release the belt in that position. Took me a while to work this out. Also note the strap in its guide. Since there are no electricals on the Euro mechanism, all redundant connectors were wrapped in adhesive-backed foam tape (to prevent rattles etc) and tucked securely out of the way.
Step 6: Reassemble the A- and B-panels
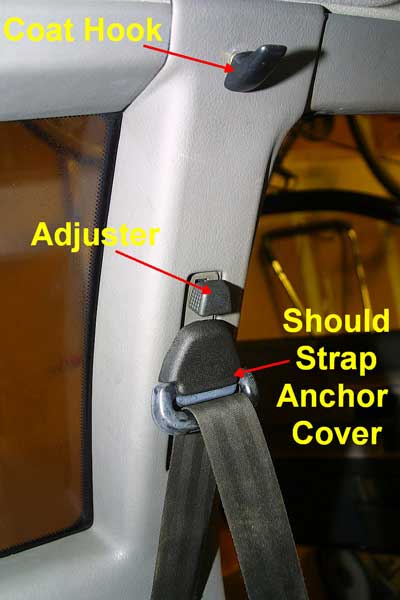
Fig. 13: The completed B-pillar assembly. The upper strap guide bolts to the hole in the anchor plate below the adjuster knob. This bolt looks identical to the one used on the rear seat belts. Again, use proper torque & LockTite. The shoulder strap cover just snaps in place (just like the rear belts). The adjuster knob is re-fitted to the adjuster after the panel is installed. The coat hook is different than on the stock setup since the angle and width of the panel is different on the Euros. Note the A-pillar panel is just visible at the top right...this is also a Euro panel since there's no track beneath it...it sits closer to the frame.
Step 7: Remove the seat recoiler and lap belt clip and install the Euro belt clip
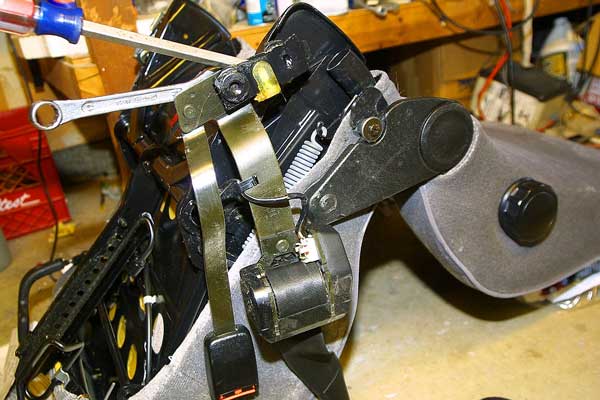
Fig. 14: Removing the stock lap belt connector and shoulder belt recoiler from the driver seat. A 17mm open end wrench is used to undo the bolt holding the recoiler. A large screw driver provides a lever to wrench against and this whole bracket can pivot. This must be replaced with the Euro clip.The electrical connector here is for the seat belt warning alarm. I just cut the wire the remove the assembly. Not sure if this will cause the alarm to always be on....I pulled the relay for it out years ago. Alternatively, test it and either short the terminals together or tape them open, which ever stops the alarm.
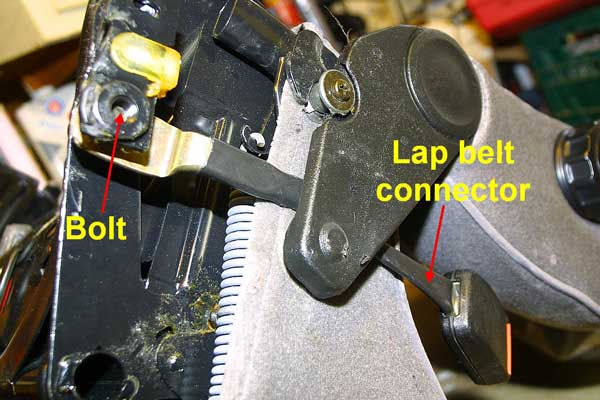
Fig. 15: The Euro lap belt clip. Note how the cable strap passes underneath the seat hinge plate (not just the plastic plate cover). I had to unclip the plate at the front pin to pass the strap under it. The strap is held to the seat in the correct angle by a notch on the flange where the bolt goes through. The opposite side of the seat must also have its lap belt recoiler removed as it is not used with the Euro setup.
Step 8: Re-install Seats and fit Euro center console
This completes the fitment of all the Euro belt components. Reassembly of the seats and Euro center console is the reverse of the disassembly.
Conclusion:
This job is highly worth doing in my opinion. For the first time is 6 years of owning my VR6 Corrado, I feel completely happy with it. No more menacing seatbelts moving around and worrying about when they will fail.